by
Mitch Altman, and friends. Last modified: 21-Apr-2025
You Can Make Cool Things With Electronics!
The projects on this page were all created for total beginners, with no experience,
so everyone can complete them successfully at my workshops, or at home, or anywhere!
All you need is:
a desire, a handful of parts, a soldering iron (with stand and sponge), a wire-cutter, a wire-stripper, solder, and an afternoon.
Everything on this page (and everything I do) is free and open source!
(That's free as in freedom.)
(But everything here is free to download -- and that is free as in beer.)
If you have any questions on anything, please feel free to email me: mitch AT CornfieldElectronics DOT com
Soldering!
Soldering is fun! And it is easy! Really, it is!
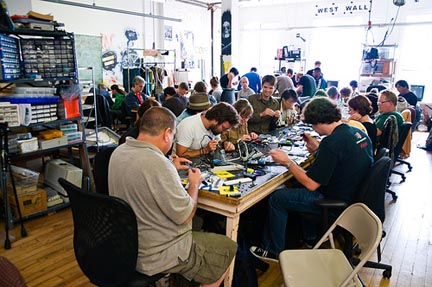
I have taught tens of thousands of people around the world how to solder.
Everyone can do it! All ages, all skill levels.
People who have never even sewn a button can easily learn to solder. Even you!
Once you learn how to make one good solder connection, you can make anything on this page.
And if you can make anything on this page, you can learn to make anything with electronics and microcontrollers.
Here is a slide presentation showing how to solder: How To Solder
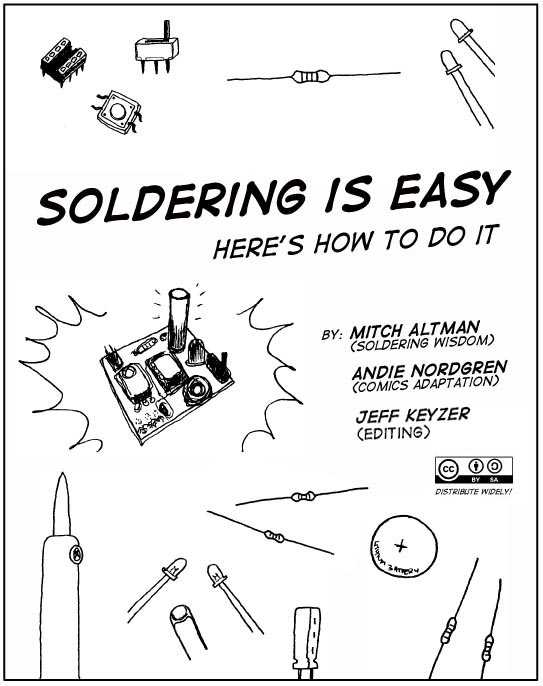
Soldering Is Easy! -- complete comic book!
Me and
Andie Nordgren
and
Jeff "mightyohm" Keyzer
have created a complete comic book to teach people who know nothing how to solder:
Please click on the above graphic to download a free copy of our complete
"Soldering Is Easy!"
comic book! It's open source -- Download it, Learn to solder with it, Copy it, Share it, Translate it, Teach with it. . . It is yours to do with as you like.
(and please let me know if you do anything cool!: mitch **AT** CornfieldElectronics **DOT** com).
This comic book is part of the book that me and Jeff were writing, which is all about: How To Make Cool Things With Microcontrollers (For People Who Know Nothing)
to be published by
No Starch Press
if I ever make time to finish writing it.
Soldering!
I taught
Andie Nordgren
to solder, and she enjoyed it so much she now teaches others! Andie is also a great artist,
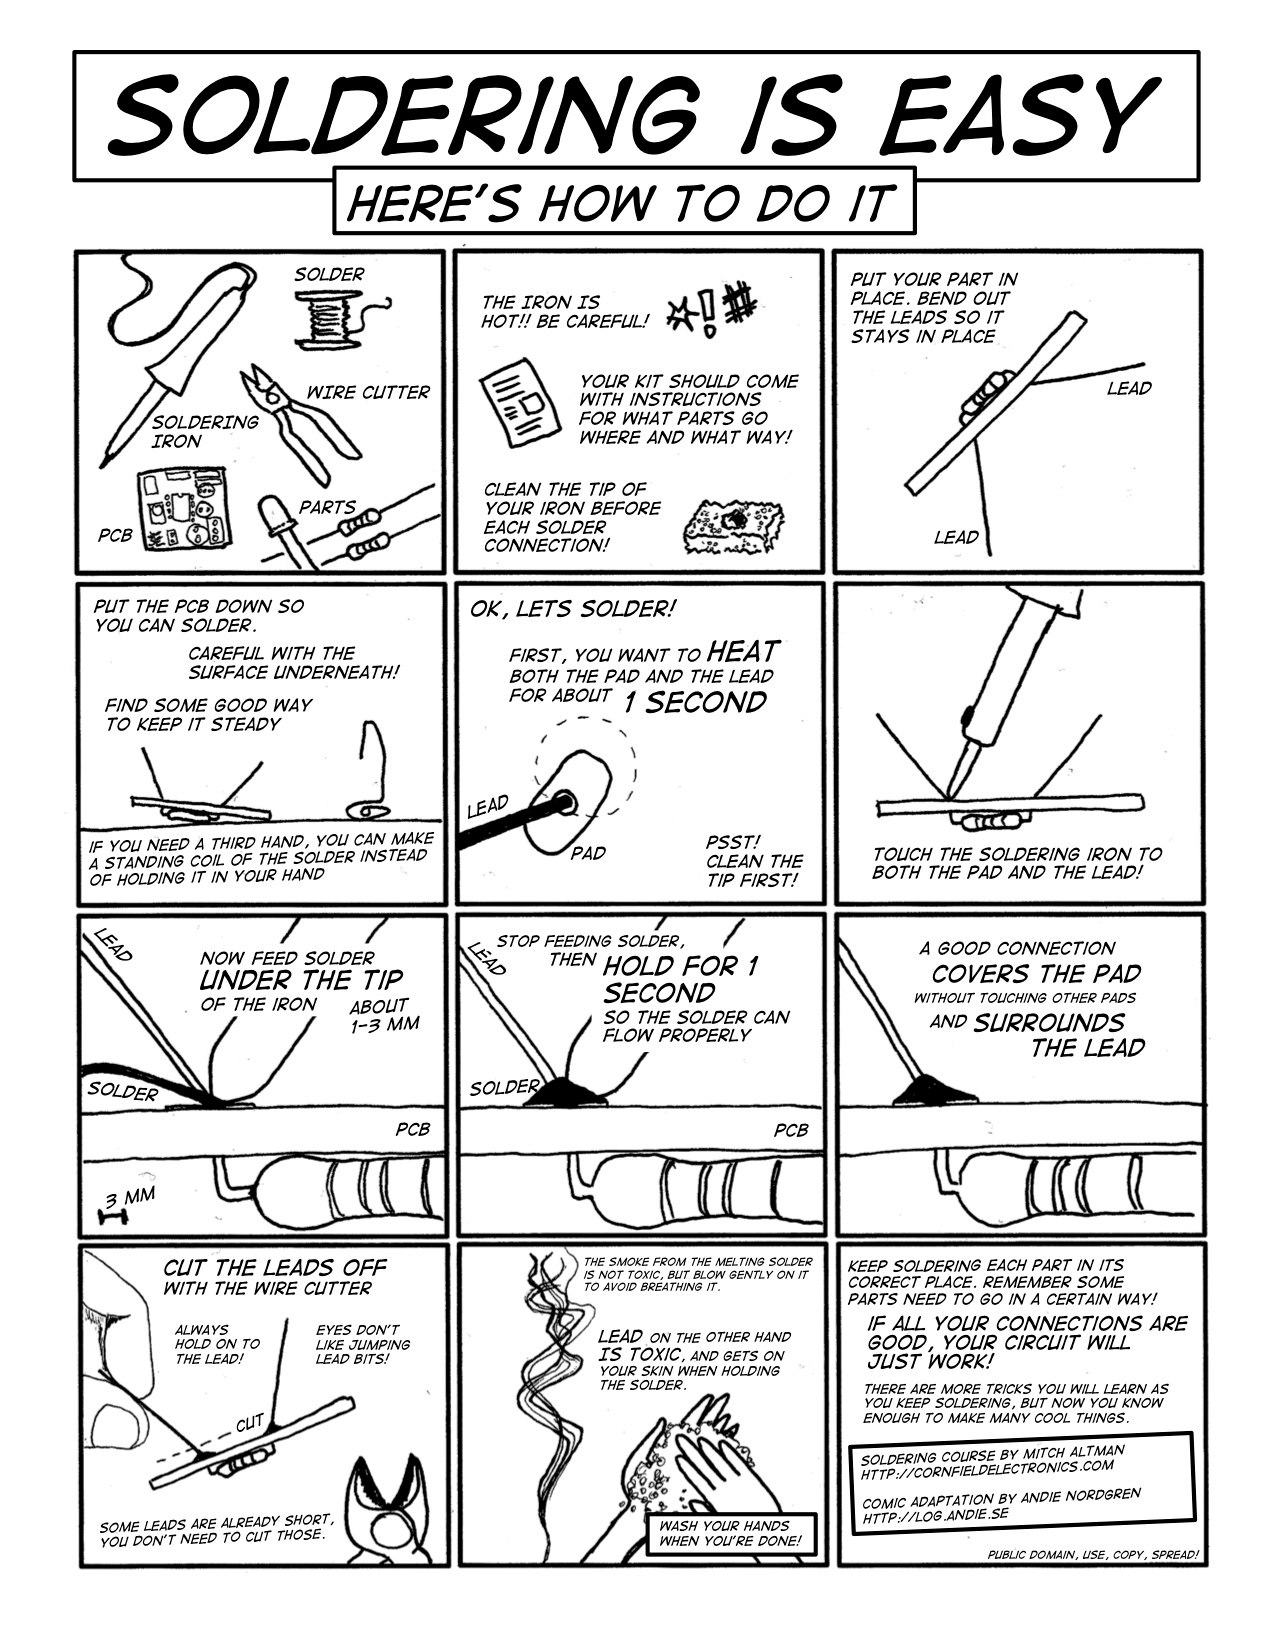
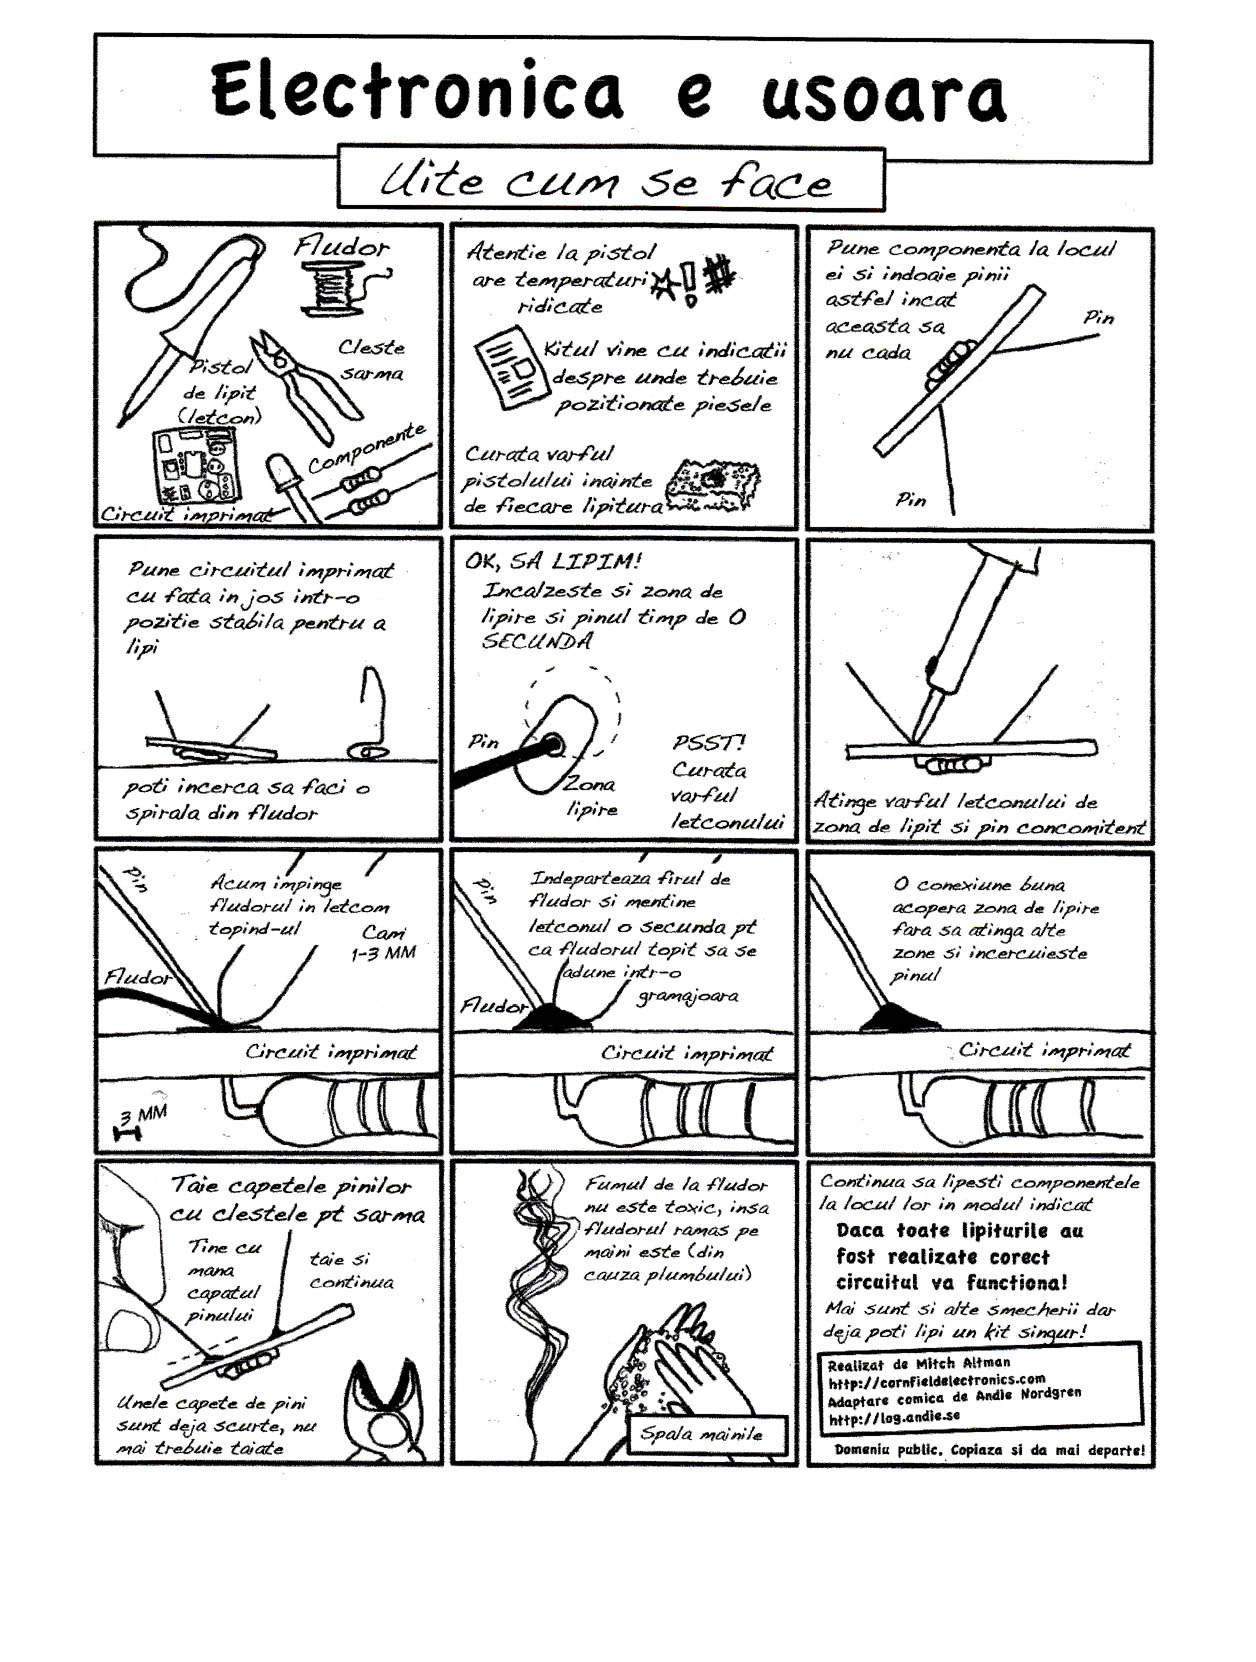
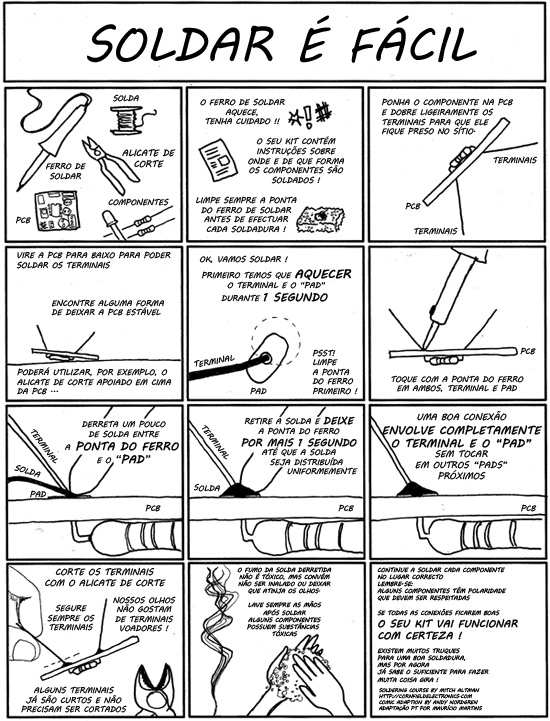
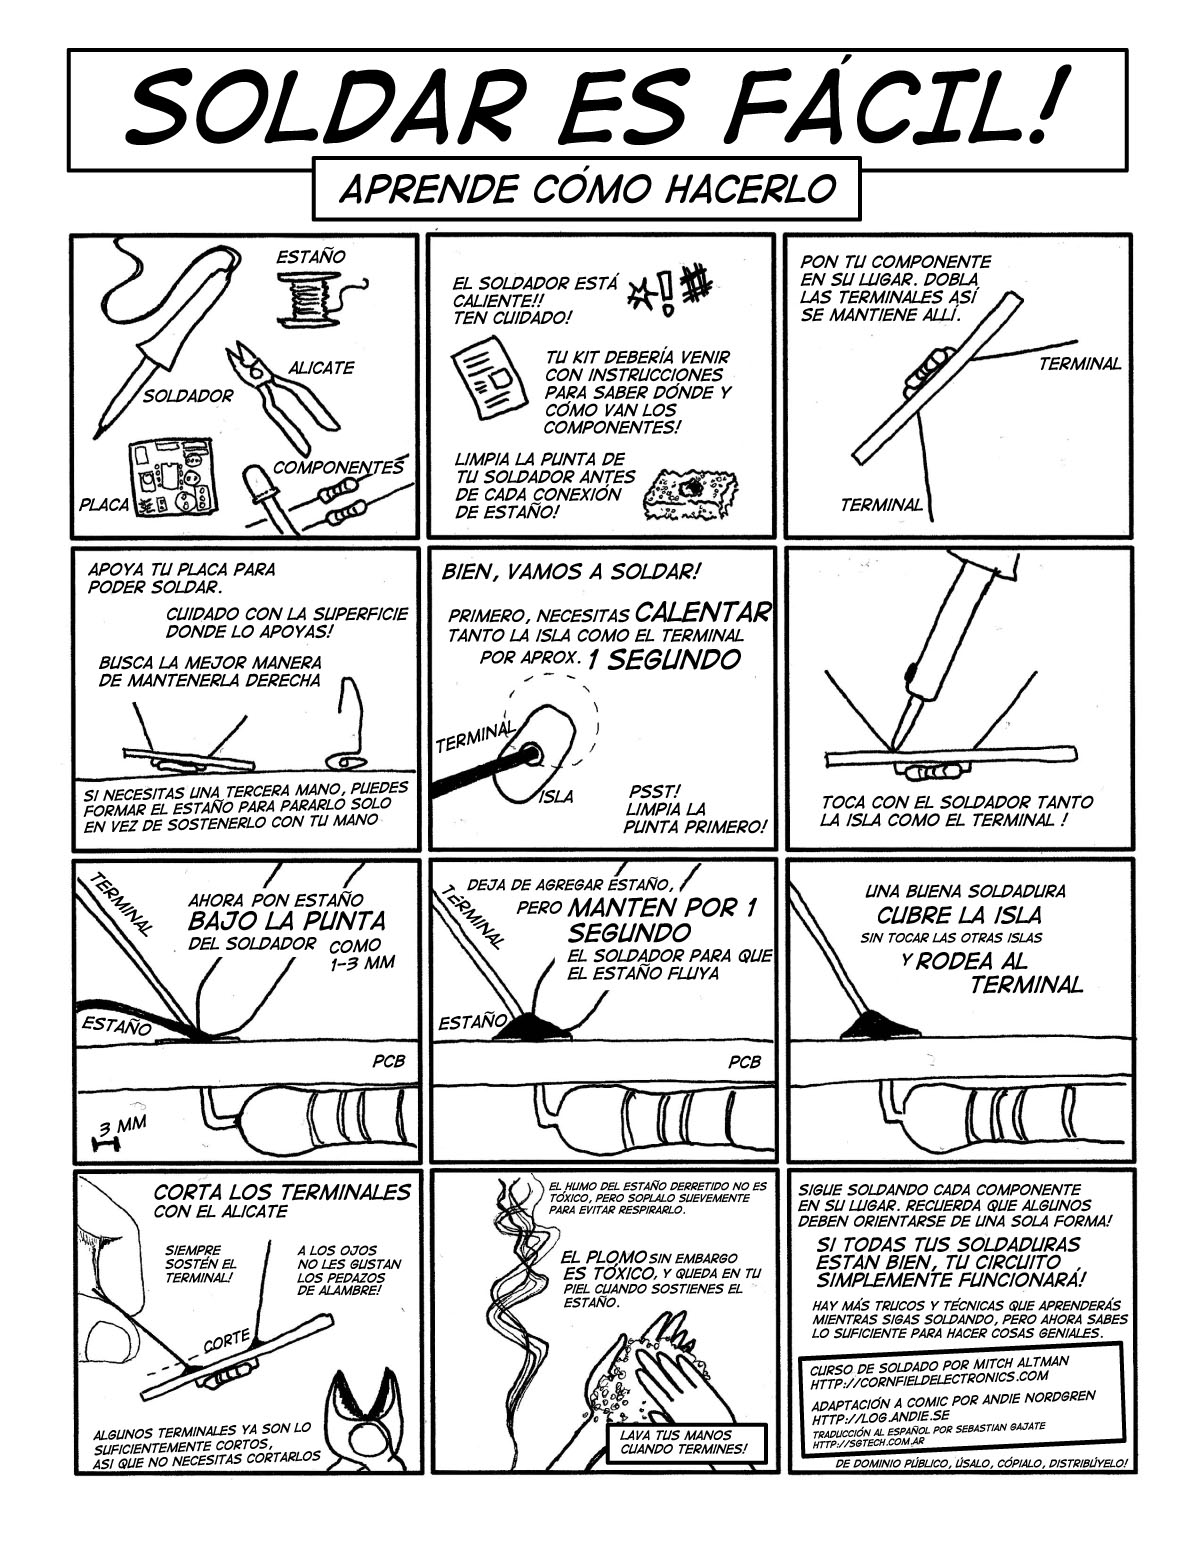
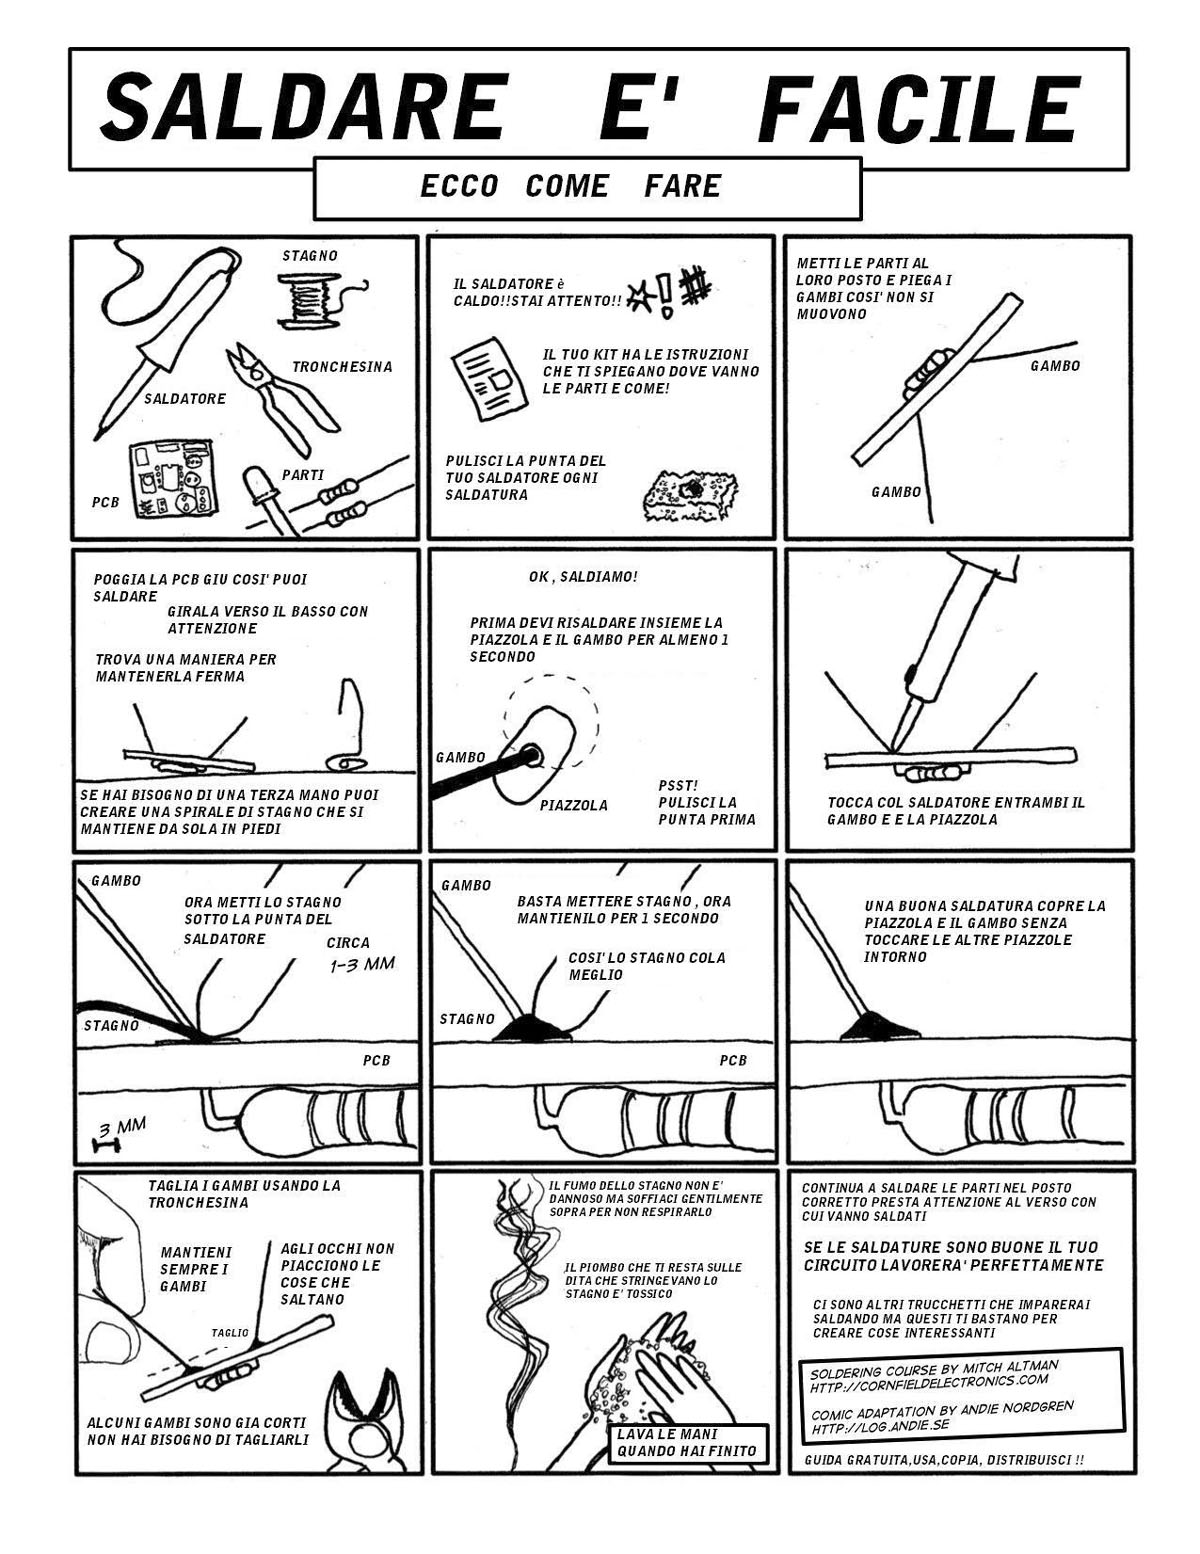
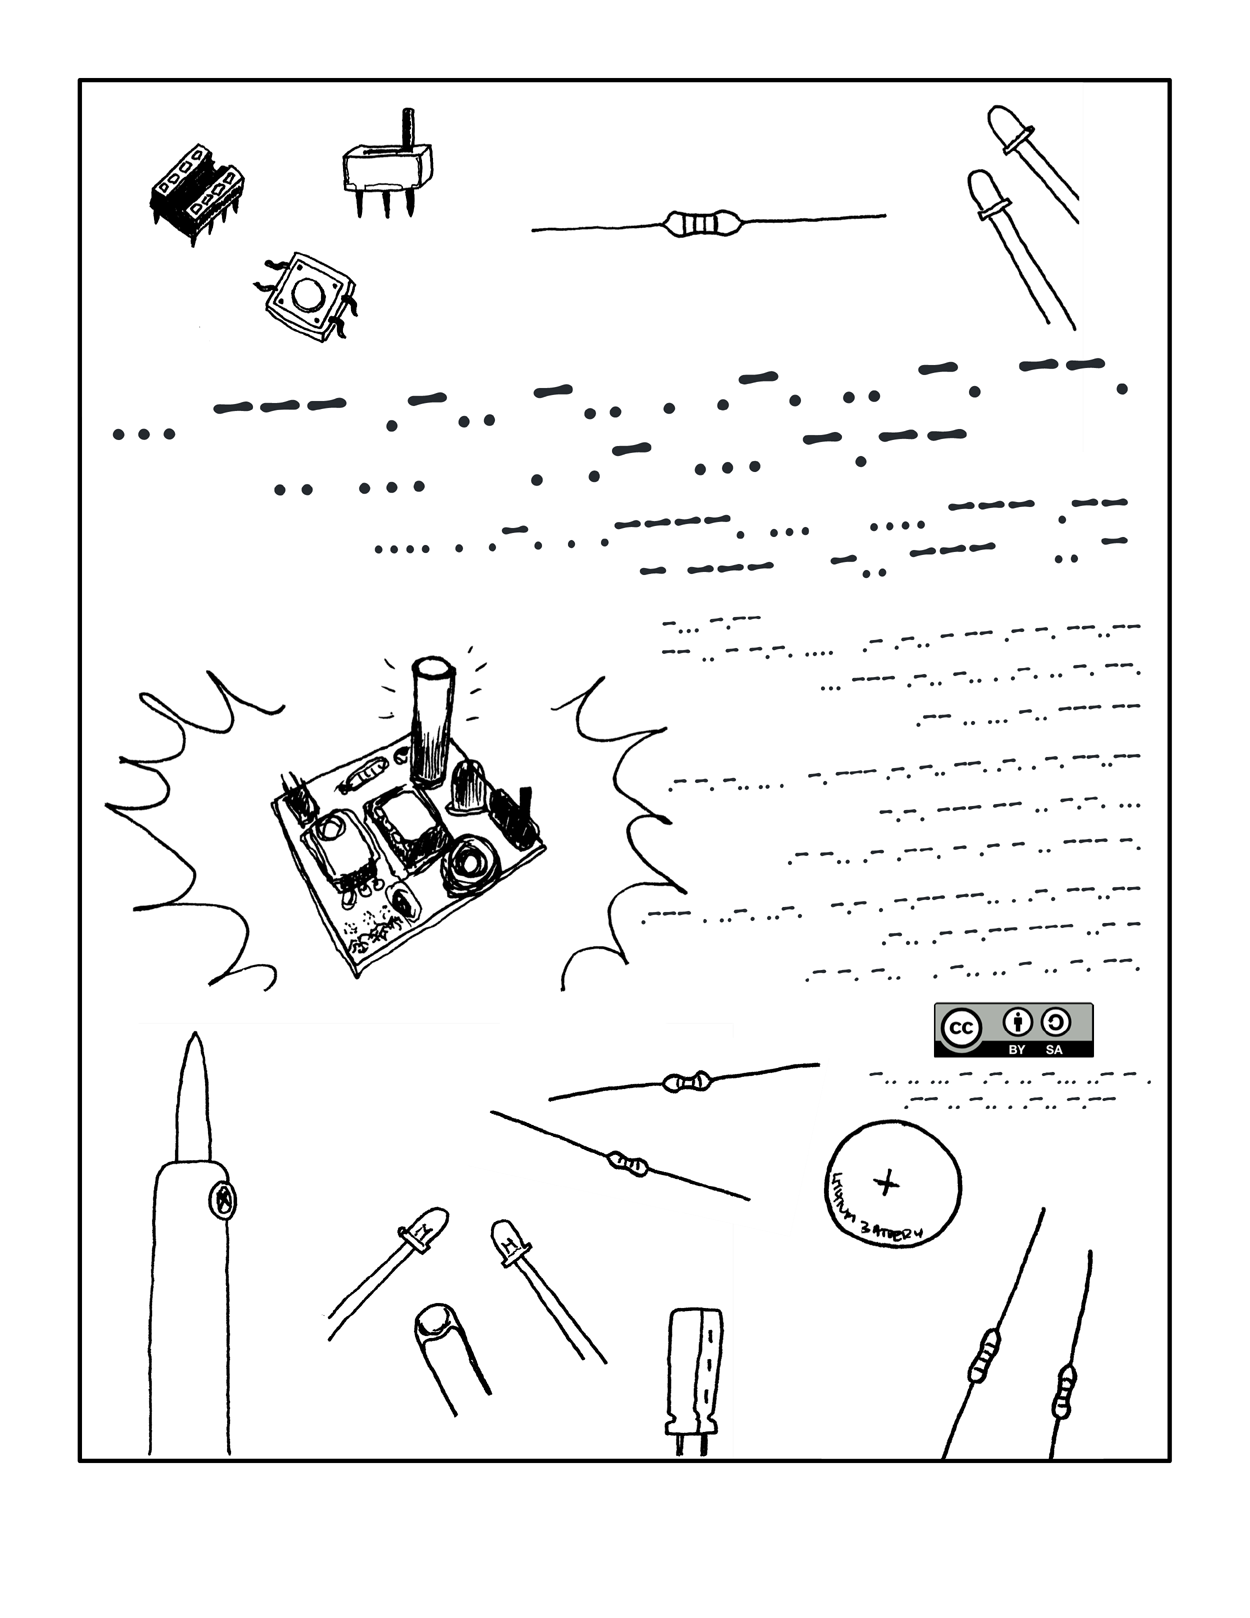
and she created a wonderful single-page comic reference sheet that shows the basics of soldering
(and has since been translated to several languages).
Click the image for a larger version, or download the PDF in English,
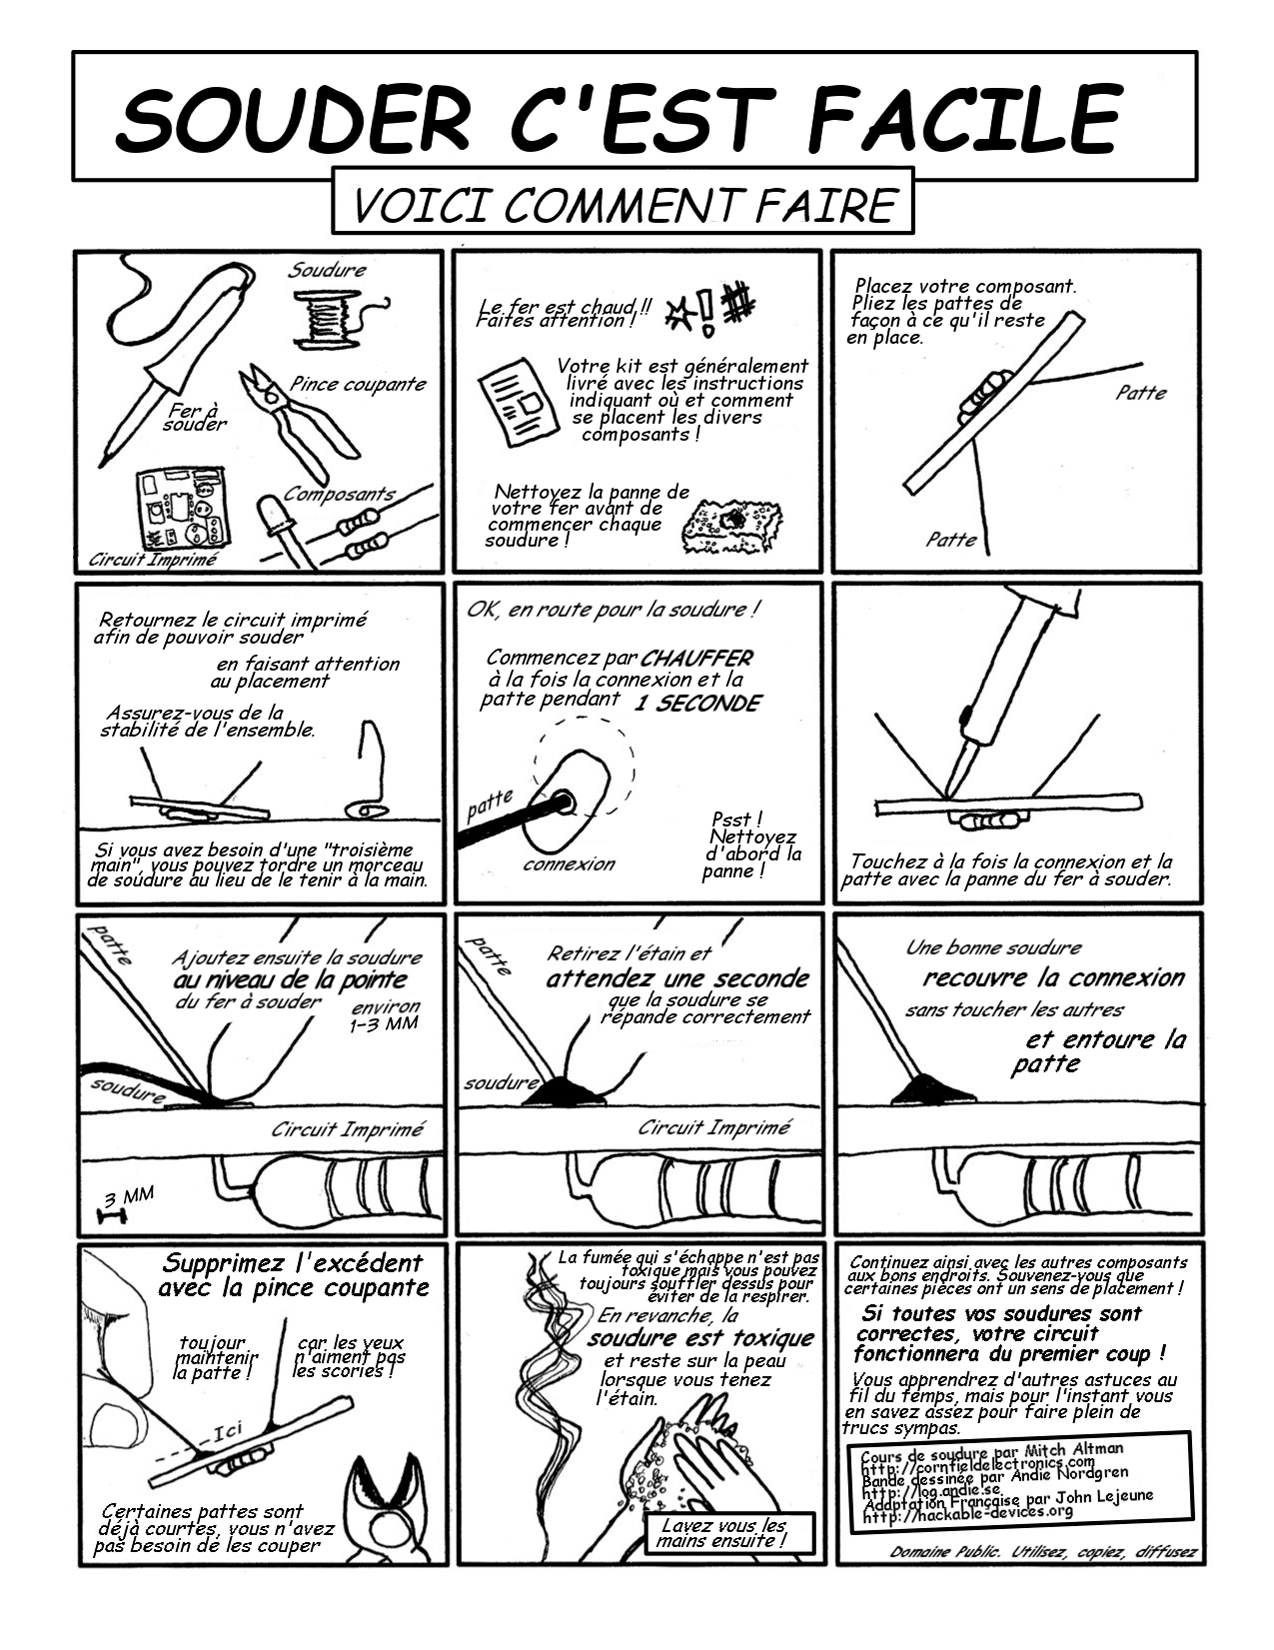
in French,
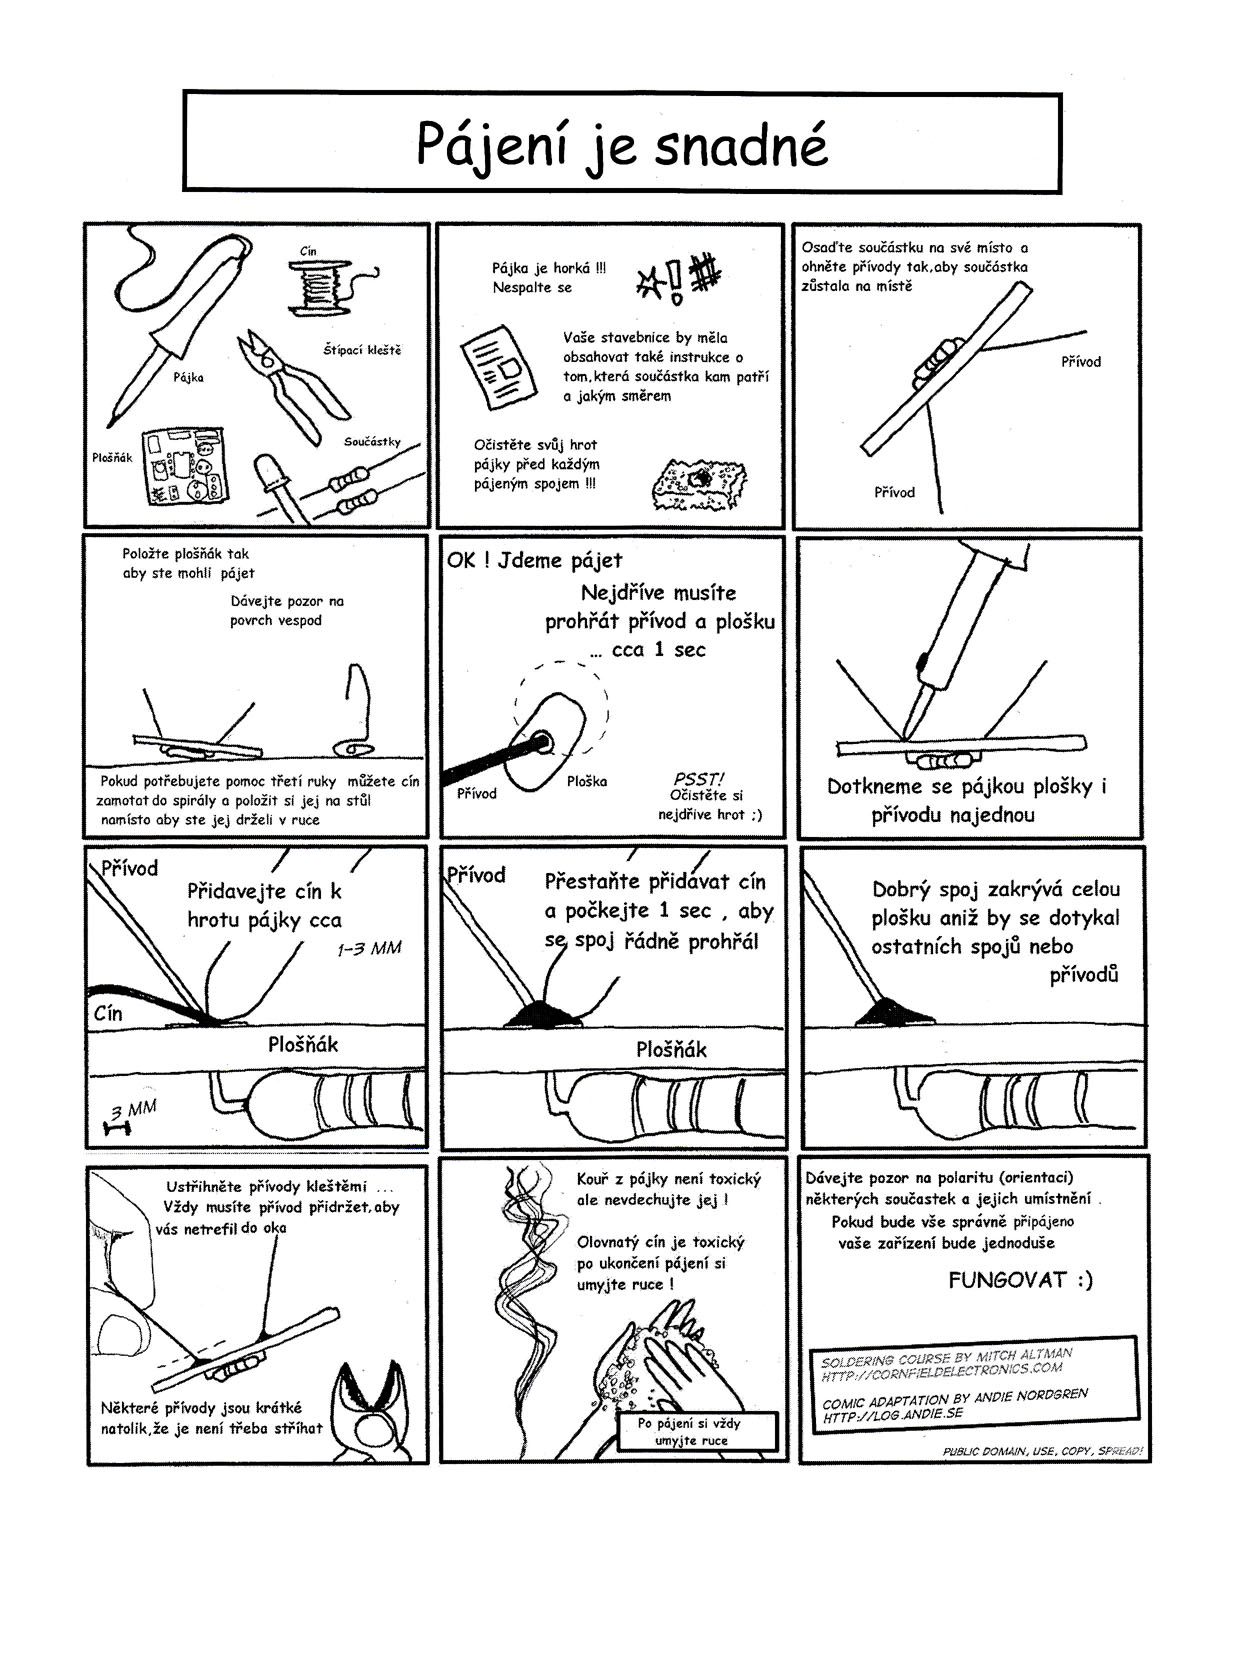
in Czech,
in Romanian,
in Portuguese,
in German,
in Spanish in Italian,
or Morse Code!
Please feel free to copy this comic, and spread it around!
Or translate it into another language
(and please let me know: mitch **AT** CornfieldElectronics **DOT** com).
The TV-B-Gone Kit turns off TVs from up to 50 meters away! Make every day a TV-free day!
I hacked the first TV-B-Gone kits from an old Adafruit MiniPOV3 kit (see a section for this way below).
This was, of course, hacked from my original
TV-B-Gone keychain.
But in 2005, Ladyada and I developed a really wonderful TV-B-Gone kit for total beginners.
This is a fun, easy way to learn to solder
-- and when you are done soldering it, you can turn off TVs everywhere you go in the world!
The TV-B-Gone kit is still incredibly popular. And still turns TVs off everywhere in public places!
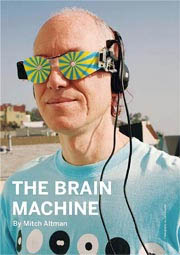
DISCLAIMER: Light and Sound Machines, such as this one, can be fun for many of us,
but may be seriously dangerous for those prone to seizures or who are photosensitive.
Early research over the last few years at MIT
and other research labs shows that "plaque" (which is one cause of Alzheimer's pathology) is reduced in mice. Studies are ongoing for helping humans with Alzheimer's pathology.
40 Hz Gamma stimulation may also be helpful for
"chemo brain fog".
There may also be some benefit to people with CFS/ME, or people with "brain fog" from long Covid.
Here are the slides I use when I give Brain Machine workshops
(including assembly instructions and reprogramming instructions): Slides I use for Brain Machine workshops.
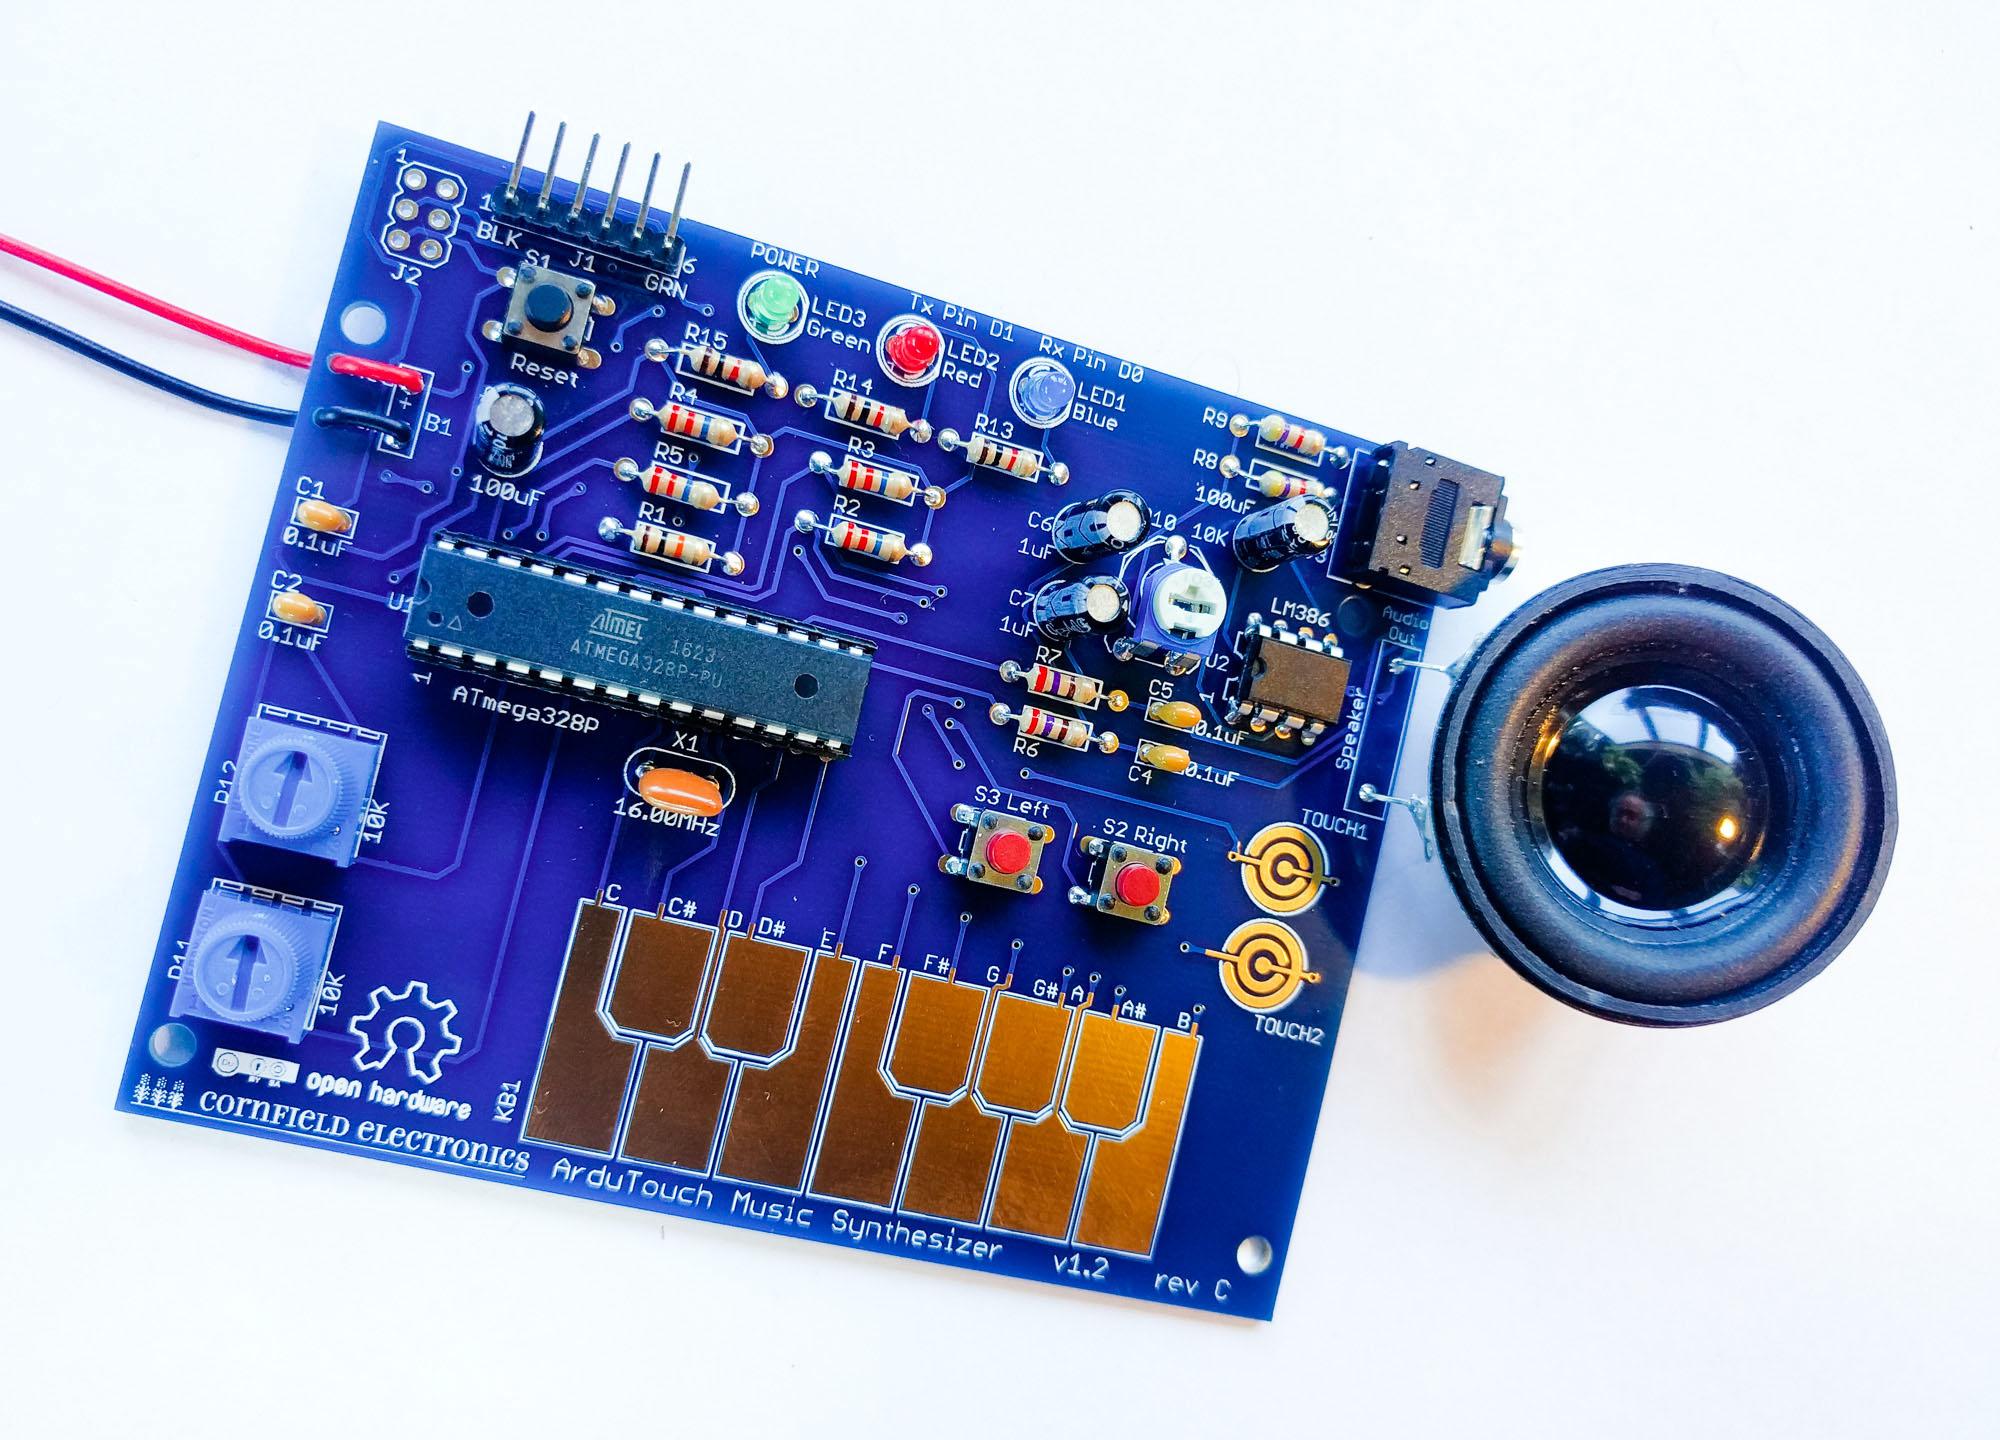
Solder your ArduTouch kit together, and it works! You can make way wonderful music, sound, and noise.
Use the ArduTouch Library or hack the existing sketches to create your own cool synthesizers. The documentation is getting good enough to learn how to use Digital Signal Processing (DSP)
to make your own sounds for your own projects. (More documentation coming.)
To program your ArduTouch music synthesizer kit,
you'll need a USB-Serial TTL cable,
such as an FTDI Friend or FTDI Cable, available all over the place.
You can purchase a nice one from Cornfield Electronics.
These USB-Serial TTL cables (made by Samurai Circuits),
require a driver (from Silicon Labs): Samurai Circuits board (SiLabs CP210x USB-to-Serial TTL) drivers: The latest drivers from SiLabs' website (Windows, MacOS, Linux)
You will also need to download the free, open-source, Arduino software (for Windows, MacOS, or Linux). Arduino software (the latest version is fine to use).
--------------------
Here are the slides I use when I give my ArduTouch workshops
(including assembly instructions and reprogramming instructions): Slides I use for ArduTouch workshops.
--------------------
One ArduTouch synth is really nice -- and 7 ArduTouch synths are even nicer! Here's a demo Video:
--------------------
The ArduTouch library and example sketches will work on any Arduino board! The ArduTouch board behaves like an Arduino Uno.
The ArduTouch Library contains everything you need to start creating your own synthesizers!
It was mostly written by my friend Bill Alessi.
The ArduTouch Library comes with a sequence of example sketches -- read through these and try them! As well as being way cool synthesizers, they also serve as really good tutorials on how to create your own synthesizer sketches for ArduTouch.
You can download the ArduTouch library, and then import it using the Arduino software: ArduTouch Library v1.16
for ArduTouch Music Synthesizer kit.
--------------------
Thick is an example of a way cool, easy-to-play synthesizer sketch for ArduTouch!
Check it out -- it sounds like it comes from a vintage analog Mini Moog. (Your ArduTouch synthesizer kit comes pre-programmed with this synthesizer.) Instructions for how to use the Thick synthesizer.
Thick was written by my friend Bill Alessi.
The sketch will work on any Arduino (the ArduTouch has its own Arduino Uno clone built in).
Thick uses the ArduTouch library (so be sure to download it, too -- see above). Thick v0.72 synthesizer sketch
Thick Demo Video:
--------------------
Arpology is another way cool example synthesizer sketch for ArduTouch!
It is highly influenced by Brian Eno. It makes arpegios on its own, and as it plays, you can change the pattern, the speed, major/minor keys, the attack and decay, and the pitch. Lots of variations, all of which sound way cool.
Arpology also has a self-play mode, in both major and minor keys, that never repeats, but continually creates beautiful (and sometimes dark) ambient sounds, patterned after J.S. Bach. Instructions for how to use the Arpology synthesizer.
Arpology was written by my friend Bill Alessi.
The sketch will work on any Arduino (the ArduTouch has its own Arduino Uno clone built in).
Arpology uses the ArduTouch library (so be sure to download it, too -- see above). Arpology v1.16 synthesizer sketch
Arpology Demo Video:
Arpology (Auto-Improvise) Demo Video:
--------------------
Beatitude is another totally different way cool example synthesizer sketch for ArduTouch!
It is a drum machine! It is also a real-time sequencer.
Drum sounds include: Kick Drum, Tom, Snare, RimShot, and High Hat
You can create your own rhythm tracks, or use a preset you created earlier.
While a rhythm track is playing, with the touch keyboard you can play bass live over the drum sequences.
With stereo panning for drum kits and bass. Instructions for how to use the Beatitude synthesizer.
Beatitude was written by my friend Bill Alessi.
The sketch will work on any Arduino (the ArduTouch has its own Arduino Uno clone built in).
Beatitude uses the ArduTouch library (so be sure to download it, too -- see above). Beatitude v1.11 synthesizer sketch
Beatitude Demo Video:
--------------------
Dronetic is a way cool example synthesizer sketch for ArduTouch!
It makes drones that you can play your own melody on top of. There are lots of presets for all sorts of spacey, beautiful, and even noisy drones. Instructions for how to use the Dronetic synthesizer.
Dronetic was written by my friend Bill Alessi.
The sketch will work on any Arduino (the ArduTouch has its own Arduino Uno clone built in).
Dronetic uses the ArduTouch library (so be sure to download it, too -- see above). Dronetic v0.64 synthesizer sketch
Dronetic Demo Video:
--------------------
NEW! Hocus is the newest, totally different way cool example synthesizer sketch for ArduTouch!
It emulates an organ with Leslie (spinning speaker) effects. Great for classic rock.
But, since we like noise, we also made it possible to make really bizarre and wonderful sounds. Use the really nice presets, or come up with your own sounds with Hocus. Instructions for how to use the Hocus synthesizer.
Hocus was written by my friend Bill Alessi.
The sketch will work on any Arduino (the ArduTouch has its own Arduino Uno clone built in).
Hocus uses the ArduTouch library (so be sure to download it, too -- see above). Hocus v1.00 synthesizer sketch
Hocus Demo Video:
--------------------
Mantra is yet another totally different way cool example synthesizer sketch for ArduTouch!
It has two preset "drone" sequences that automatically play percussion/bass/drone-melodies. With the touch keyboard you play lead over the drone.
Mantra is designed so that it is almost impossible to play something that doesn't sound good.
The keyboard uses an exotic non-western tuning.
The white keys are your scale, and the black keys repeat one of the neighboring white keys with a built-in bend added. Instructions for how to use the Mantra synthesizer.
Mantra was written by my friend Bill Alessi.
The sketch will work on any Arduino (the ArduTouch has its own Arduino Uno clone built in).
Mantra uses the ArduTouch library (so be sure to download it, too -- see above). Mantr v0.97 synthesizer sketch
Mantra (Drone Sequence A) Demo Video:
Mantra (Drone Sequence B) Demo Video:
--------------------
Quadrant is a totally different way cool example synthesizer sketch for ArduTouch!
It creates loops with notes and arpegios, and can warp them each time through the loop to make beautiful mesmerizing music, dark sounds, as well as energetic dancy music.
Experiment with the presets, or come up with your own diverse sounds with Quadrant. Instructions for how to use the Quadrant synthesizer.
Quadrant was written by my friend Bill Alessi.
The sketch will work on any Arduino (the ArduTouch has its own Arduino Uno clone built in).
Quadrant uses the ArduTouch library (so be sure to download it, too -- see above). Quadrant v1.73 synthesizer sketch
Quadrant Demo Video:
--------------------
Xoid is yet another totally different way cool example synthesizer sketch for ArduTouch!
It makes very noisy, electronic sounds, as well as some very beautiful ones.
Experiment with the presets, or come up with your own sounds with Xoid. Lots of cool sounds await you. Instructions for how to use the Xoid synthesizer.
Xoid was written by my friend Bill Alessi.
The sketch will work on any Arduino (the ArduTouch has its own Arduino Uno clone built in).
Xoid uses the ArduTouch library (so be sure to download it, too -- see above). Xoid v0.98 synthesizer sketch
Xoid Demo Video:
--------------------
ZapShot is another crazy noisy and wonderful example synthesizer sketch for ArduTouch!
It makes very noisy, electronic sounds, that are sometimes reminiscent of video games, sometimes just out of this world.
Experiment with the presets, or come up with your own sounds with ZapShot. Instructions for how to use the ZapShot synthesizer.
ZapShot was written by my friend Bill Alessi.
The sketch will work on any Arduino (the ArduTouch has its own Arduino Uno clone built in).
ZapShot uses the ArduTouch library (so be sure to download it, too -- see above). ZapShot v1.34 synthesizer sketch
ZapShot Demo Video:
--------------------
DuoPoly is an example sketch that shows off a lot of the ArduTouch music synthesizer's capabilities.
It was mostly written by my friend Bill Alessi.
The sketch will work on any Arduino (the ArduTouch has its own Arduino Uno clone built in). DuoPoly shows off a bunch of cool things that the ArduTouch can do, including:
Tremelo, Vibrato, Pitch Bend, Distortion Effects, Low Pass Filter, High Pass Filter,
Preset songs/patches, LFOs, and more...
DuoPoly uses the ArduTouch library (so be sure to download it, too -- see above). DuoPoly v2.52 synthesizer sketch
for ArduTouch Music Synthesizer kit.
Here is a Quick Reference Guide for how to use all of the way cool (and complex) controls for playing the ArduTouch Music Synthesizer with the DuoPoly sketch: DuoPoly Quick Reference Guide v2.52
DuoPoly Hive Preset song:
DuoPoly Industry Preset song:
DuoPoly Omission Preset song:
DuoPoly Cadiz Preset song:
--------------------
Here is the sketch for the first, ArduTouch mono kit (no longer available) -- this does not use the ArduTouch Library: ArduTouch mono board sketch
Anyone can learn to solder!
This kit was designed for people who have never made anything before.
Simple step-by-step instructions show you how.
Once you finish, you get a cool colored blinky light badge you can wear.
Plus, it doubles as a flashlight!
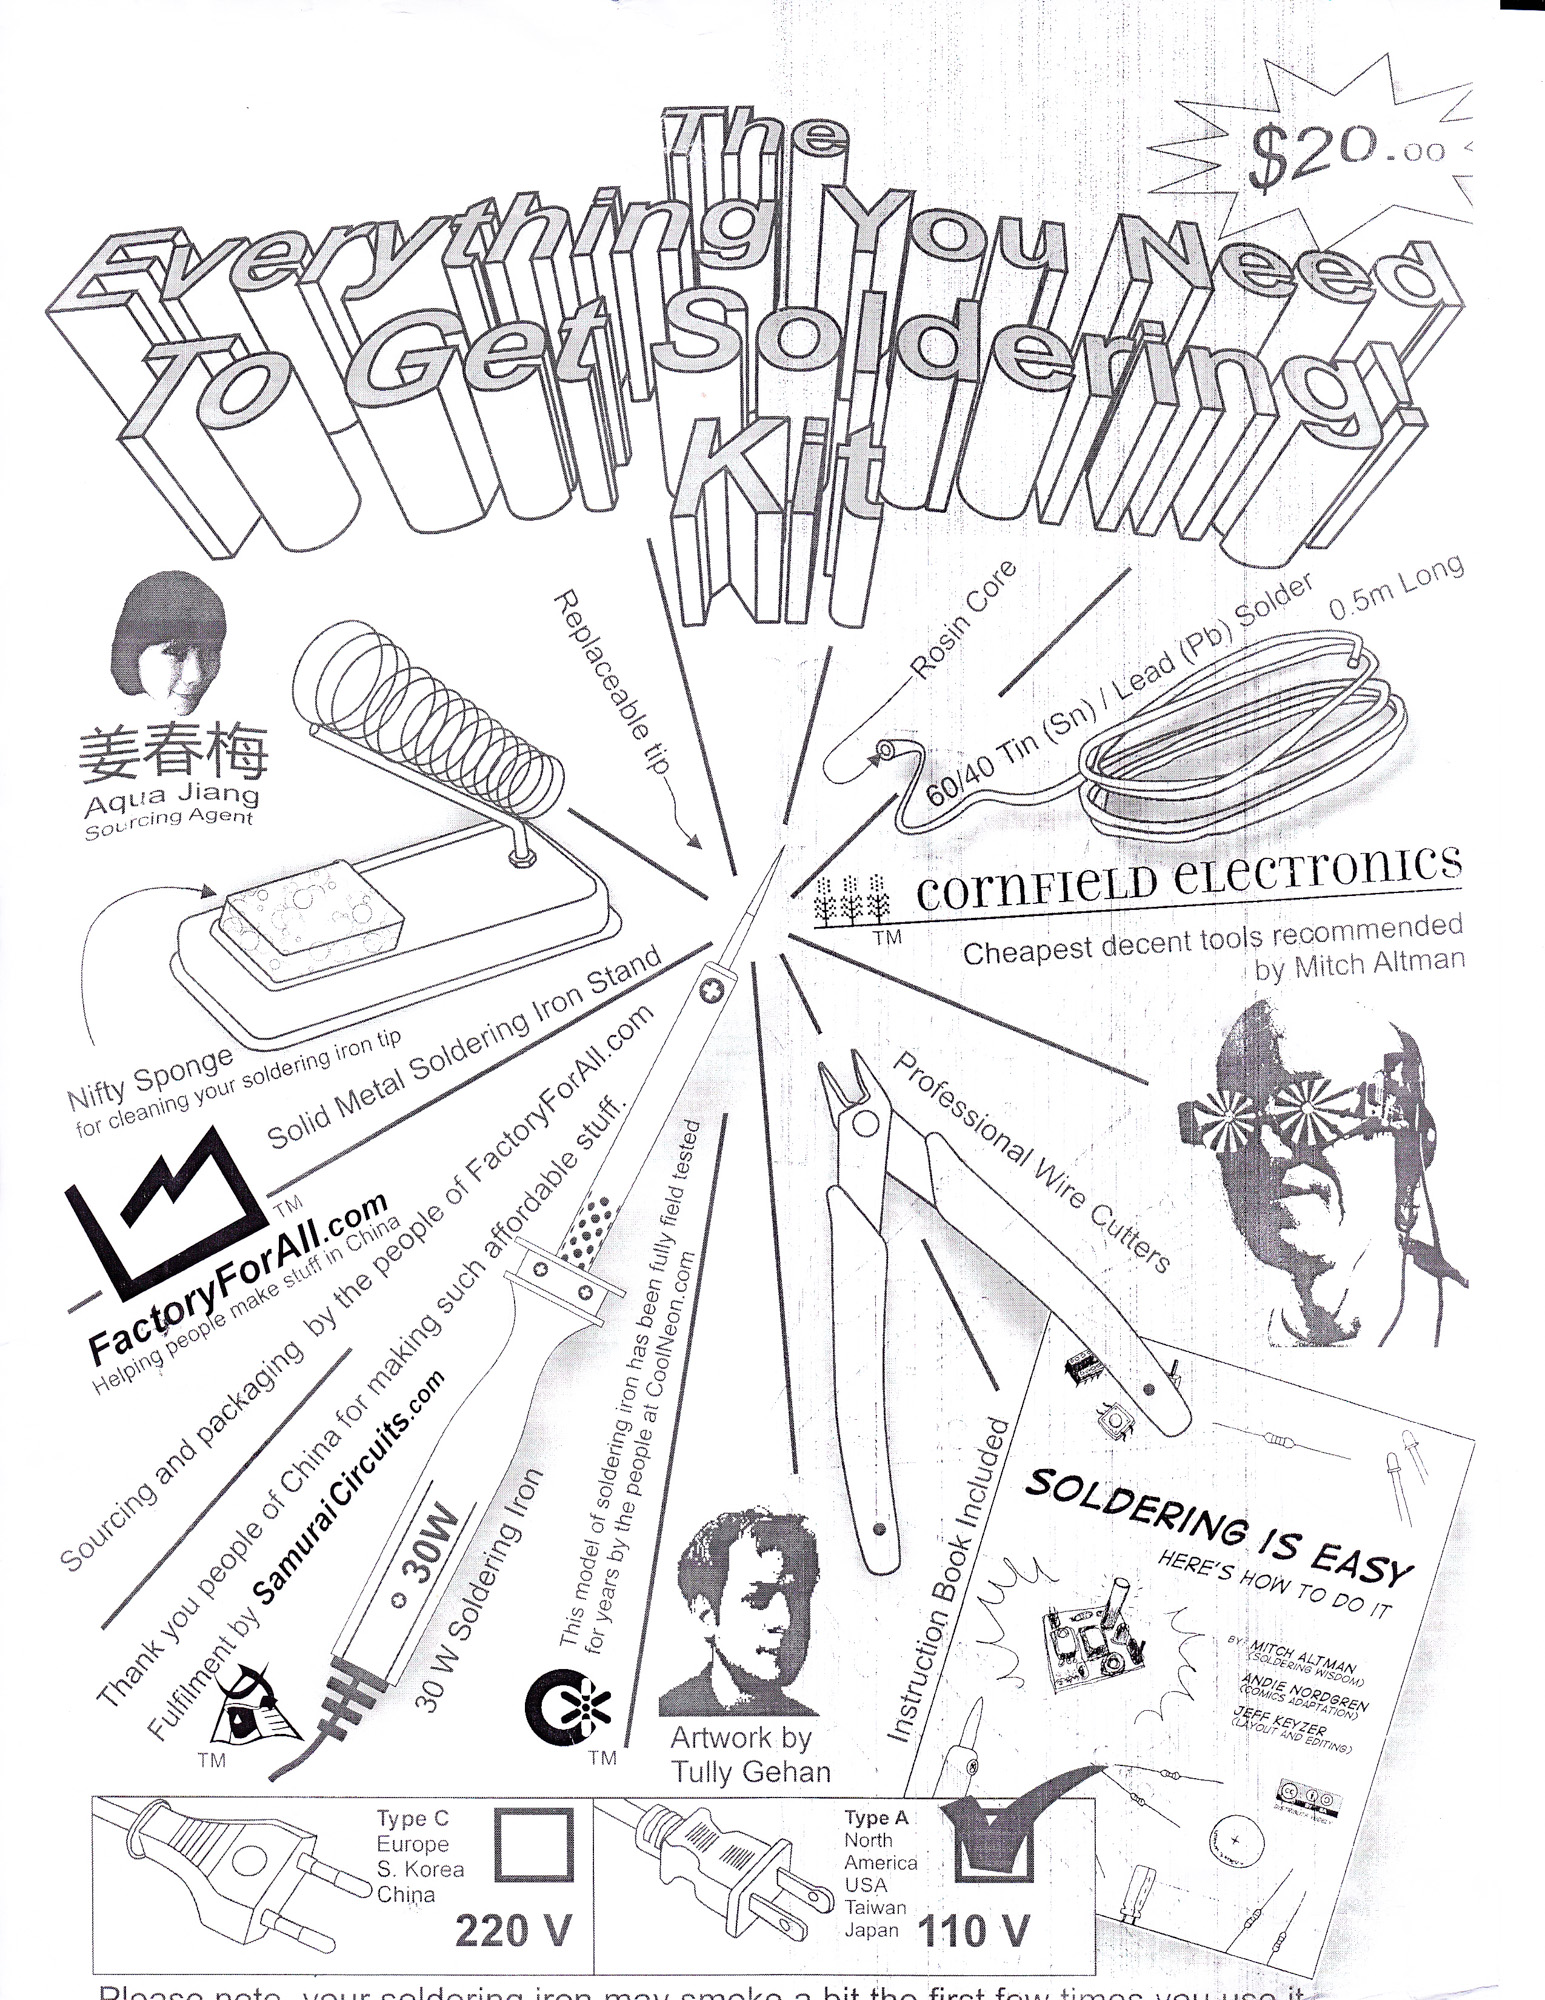
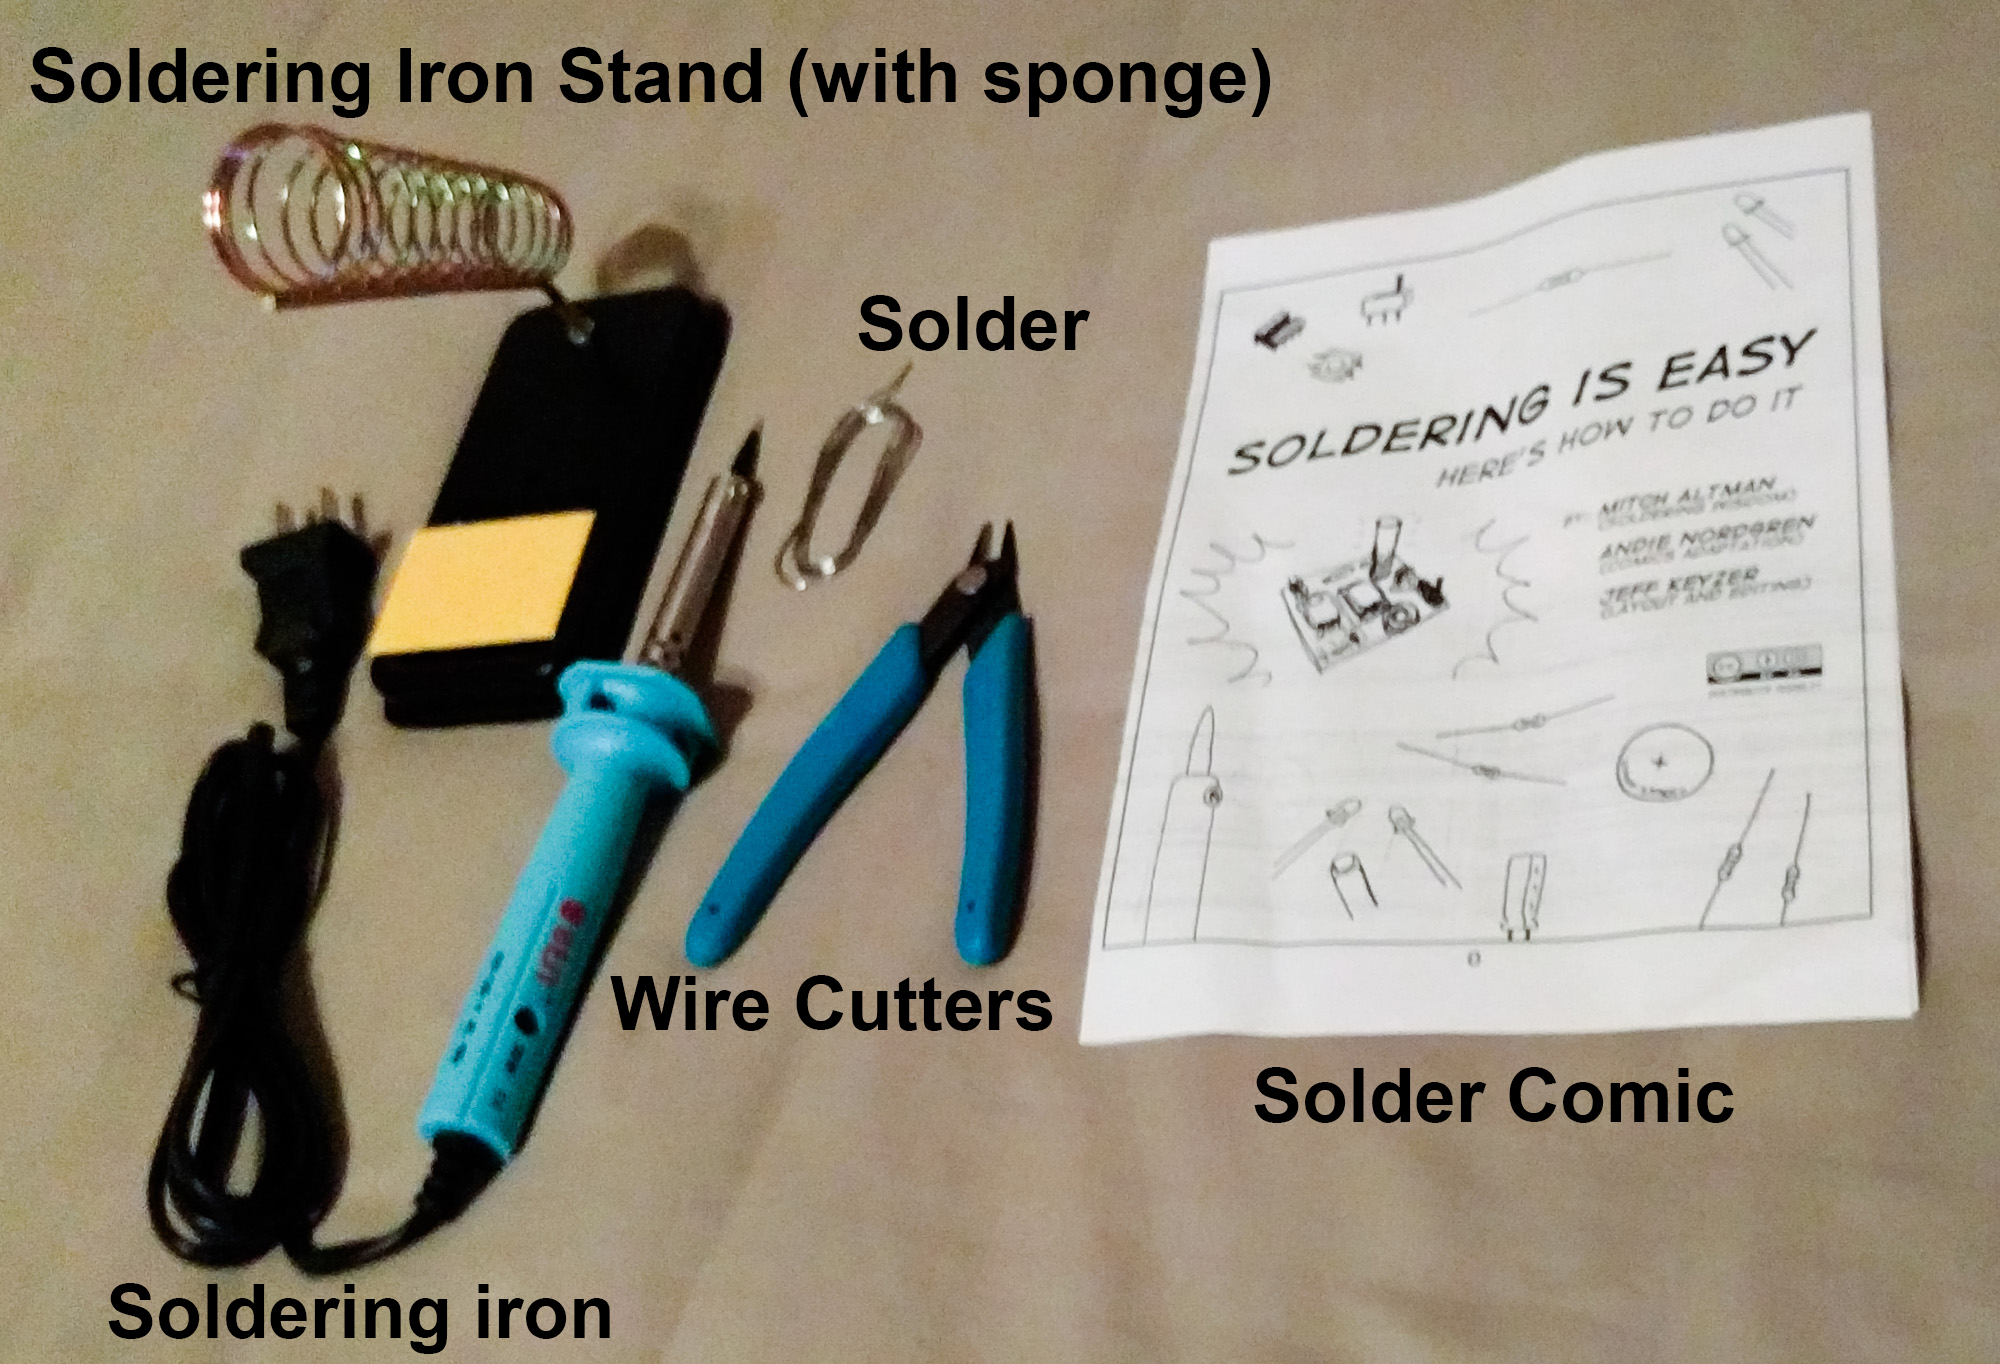
My friend Tully lives in Shenzhen, China, and has access to lots of cool resources there.
Together, Tully and I found the best inexpensive soldering tools available,
and put them together in this toolkit for you.
There really is everything you need to get soldering:
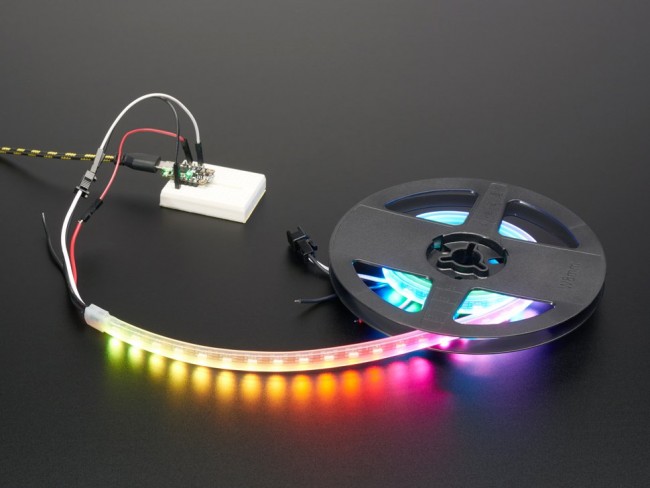
The Trippy RGB Waves project (see further below) was so popular that I created a kit for it.
Thousands of people of all ages have made this kit, including
kids as young as 4 years old.
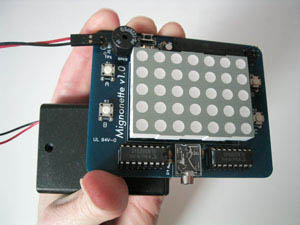
At the San Francisco Maker Faire in May, 2008, Mitch and Rolf released our Mignonette Game kit.
Mignonette is a small hand-held game that has an LED matrix instead of an LCD.
It is very simple to build, even for people who have never built anything before,
and great for learning how to make things with microcontroller chips.
Based on the
Mignon Game Kit,
but with two-colored LEDs, and other added features,
Mignonette comes with a game we wrote called Munch (with more games to come).
All hardware and firmware are open source, and are easily hack-able.
We have a separate website for our
Mignonette Game, where you can find detailed info,
including schematic, firmware, and PCB layout.
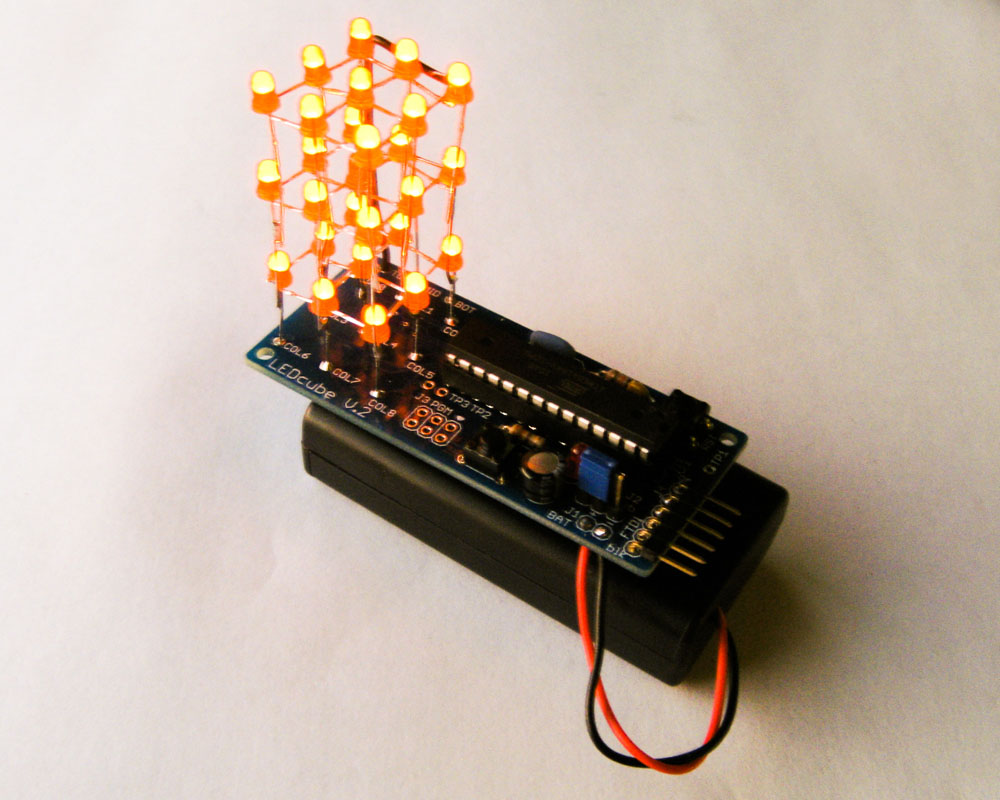
Here's the
Arduino sketch for the LEDcube kit v2.
Unzip the file into your Arduino "libraries" folder, and you will see several example sketches in the Arduino Examples menu.
for the LEDcube Kit v2
For the firmware source code for the MiniPOV3, please go to
MiniPOV3! firmware.
And here is the
makefile(these are not needed for the other projects on this page).
Unfortunately, you can no longer purchase a MiniPOV3! kit. But the open source files are all available
or on the
MiniPOV3 website.
You can download a
Message Generating Program
for the MiniPOV3 (for Windows). -- 284KB This was written by Ben Perkins, who gave me permission to share it. -- Thanks Ben!
Other Message Generating Programs for the MiniPOV3 are available on the
Adaftuit User Forum
Atmel AVR microcontrollers
All of the projects on this page use Atmel AVR family microcontrollers.
The Atmel ATmega328P is the microcontroller used in the Arduino Uno, and many projects on this projects webpage.
For the datasheet, please go to
Atmel AVR ATmega328P datasheet.
The Atmel ATtiny2313 is the microcontroller used in the MiniPOV3.
For the datasheet, please go to
Atmel AVR ATtiny2313 datasheet.
For those into assembly language, the AVR family instruction set, please go to
Atmel AVR family instruction set.
For a really great online user community of support for all Atmel AVR microcontrollers
AVR Freaks is the place to go, where geeks from all over the world are awake
day and night wanting nothing more than to answer your questions!
You can easily set up your computer to program AVR microcontrollers!
Easy-to-follow instructions for Windows, Mac OS X, and Linux
are available on the
Mightyohm website.
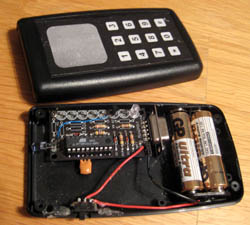
Project: Make your own Brain Machine (from MAKE Magazine #10)
For the Brain Machine Kit please scroll up!
Relax and rejuvenate as your brain synchronizes to a wonderful meditative state,
and enjoy as you hallucinate beautiful colors and patterns from your subconscious mind!
This was my first AVR project.
It is easy for anyone to make because it is hacked from the super easy to make
MiniPOV3 Kit.
Here is a fun 5-minute video
for the Brain Machine project, which was created by Bre Pettis when he did Weekend Projects for MAKE Magazine.
(And the same video in MP4 format.)
Since writing the Brain Machine article in MAKE, I have learned how to make
the Brain Machine better.
Here is an
updated and annotated version
of the original MAKE Magazine article.
If you bought a Brain Machine Kit from me, it came with a single-page instruction sheet.
A copy of the instruction sheet is available
here.
I made a slight update to the Brain Machine firmware: use a more pleasing base frequency for the sound.
For the updated firmware, please go to
the latest SLM firmware.
The sound with this updated firmware will be even better if you use 2.2K ohm resistors for R5 and R6 instead of 1K, as it says in the MAKE article.
For an updated schematic, please go to
the latest SLM schematic.
For a detailed description of the firmware and how it works, please go to Brain Machine Firmware Theory.
Unfortunately, the Brain Machine kit(which is not hacked from the MiniPOV3),
is no longer available from
Ladyada's website,
But several people have created Brain Machine projects using Arduino, including
this one
from
LaughingOnWater .
TripGlasses
Relax and rejuvinate as your brain synchronizes to a wonderful meditative state,
and enjoy as you hallucinate beautiful colors and patterns from your subconscious mind!
This is a manufactured, ready-to-use (not a kit) version of the Brain Machine.
www.TripGlasses.com.
TripGlasses are no longer available for purchase.
Project: Make your own open source TV-B-Gone (hacked from a MiniPOV 3 Kit)
For the TV-B-Gone Kit please scroll up!
This is NOT the TV-B-Gone Kit -- see above for the TV-B-Gone Kit.
This is an open source version of my TV-B-Gone remote control, hacked from a MiniPOV3 Kit,
(and, of course, also hacked from my original
TV-B-Gone.)
It is not super reliable, since it relies on the internal oscillator of the ATtiny2313 chip (which isn't super accurate).
But it works most of the time.
For the firmware source code for North America, please go to
TV-B-Gone NA firmware.
For the database of North American TV POWER codes, please go to
TV-B-Gone NA POWER codes.
For the firmware source code for Europe, please go to
TV-B-Gone EU firmware.
For the database of European TV POWER codes, please go to
TV-B-Gone EU POWER codes.
For the makefile for both NA and EU firmware, please go to
makefile.
For the schematic, please go to
TV-B-Gone schematic.
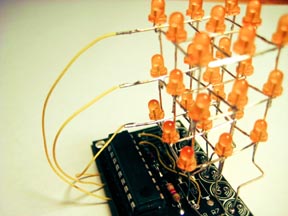
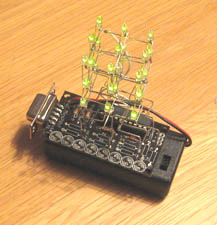
Project: Make your own LEDcube Kit v1
For the newer LEDcube Kit please scroll up!
NOTE: This is NOT the newer LEDcube kit (see above)
An animated 3D cube of LEDs!
This is a small 3x3x3 single-color version of the amazing
color 3D Borg cube
by
Das-Labor.
This original version was hacked from Adafruit's MiniPOV3 kit (which is no longer available).
To see a video of the kit in action, please go to
LED Cube video.
For the firmware source code of the test firmware for the LEDcube Kit, please go to LEDcube Kit Test firmware.
For firmware source code for a more interesting animation for the LEDcube Kit, please go to LEDcube Kit firmware.
And here is the
makefile for both of the above.
Visually program your own LEDcube animation sequences!" Andrew Stock
created a super-easy-to-use web-based tool
that lets you
visually design your own animation patterns for the LEDcube.
The results can be easily pasted into my firmware and programmed into the LEDcube.
(When creating Code, choose "Height-depth-width order").
Here is his web-based tool: http://have.funoninter.net/LEDCube/
This works best using Firefox.
This was the first project made at
NYC Resistor,
a hacker space that started in New York in 2008.
After coming back from the
Chaos Communications Congress,
we were so inspired by the
color 3D Borg cube
by
Das-Labor,
a German hacker group, that me, Bre, and George decided to build our own miniature LEDcube.
For a Weekend Project video for how to make this project, please go to
Make an LED Cube.
For the firmware source code, please go to
LED Cube firmware.
And here is the
makefile.
To see a video of this firmware in action, please go to
LED Cube video.
To see some close up photos of the hardware I built, please go to
LED Cube photos.
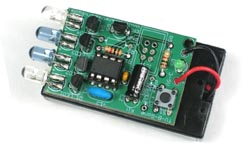
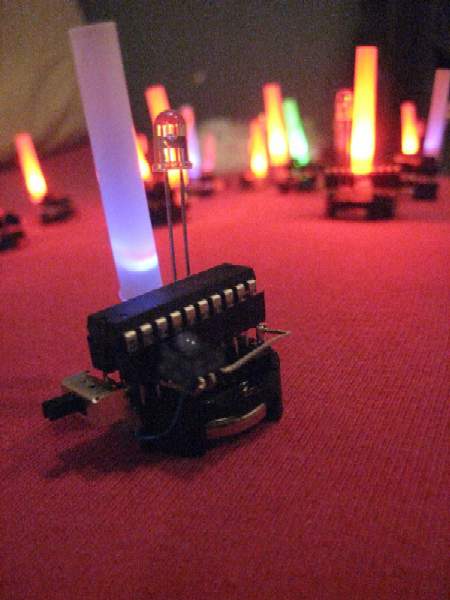
Project: Trippy RGB Waves
This is NOT the Trippy RGB Waves Kit -- see above for the Trippy RBG Waves Kit.
I created this project while artist in residence for the month of August, 2008 at
AS220,
an arts space in Providence, RI. Imagine a bunch of little lights (maybe 20 or 40 of them),
on a table, each about the size of a chess piece.
Each is independent of the other.
You arrange them around on the table any way you want.
Each one continually slowly changes colors on its own.
When you wave your hand over them, it creates waves of
colors that follow your hand.
I hacked this project from the Trippy RGB Light (see below),
(which was hacked from a MiniPOV3 kit).
I didn't use a PCB, but soldered all components directly together,
and added an IR emitter and an IR detector to sense when you wave your hand over it,
and when you do, it resets the RGB sequence from the beginning.
The net effect, when you wave your hand over a table-full of them,
is that waves of colors follow underneath your hand.
For the firmware source code and technical description, please go to
Trippy RBG Waves firmware.
And here is the
makefile.
For the schematic, please go to
Trippy RGB Waves schematic.
To see a video of this project in action, please go to
Trippy RGB Waves project video.
To see some close up photos of the hardware I built, please go to Trippy RGB Waves project photos.
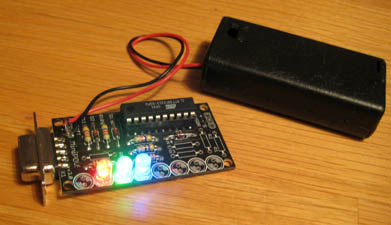
Project: Make your own Trippy RGB Light
A mood light that sequences through all sorts of changing colors. Trippy!
This is a very easy hack from the MiniPOV3 Kit.
This project is the basis for the Trippy RGB Waves project (see above),
which I turned into the Trippy RGB Waves kit (see above).
For the firmware source code, please go to
RGB Light firmware.
For the schematic, please go to
RGB Light schematic.
And here is the
makefile.
To see a high-res photograph of the Trippy RGB Light, please go to
Trippy RGB Light photo.
For detailed assembly instructions, please go to
Trippy RGB Light assembly instructions.
The list of parts (with part numbers) is available at
Trippy RGB Light Bill of Materials.
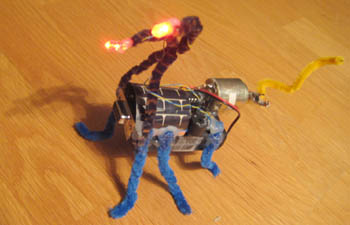
Project: Make your own Solar BugBot
This excitable critter sings and dances when she eats light.
She is a vibrabot, with an off-balance motor, speaker, and solar panel, hacked from a MiniPOV3 kit.
For the firmware source code, please go to
BugBot firmware.
And here is the
makefile.
For the schematic, please go to
BugBot schematic.
The list of parts (with part numbers) is available at
Solor BugBot Bill of Materials.
To see a high-res photograph of the BugBot, please go to
BugBot photo.
Cool Neon
Benny, of
Cool Neon
gave a presentation using EL-Wire at my booth at San Francisco Maker Faire 2007.
You can order EL-Wire and associated supplies at the
CoolNeon.com website.